1.文件操作 本节介绍如何利用C++语言来处理文件的一些操作,我们知道所有的数据在计算机上保存的时候都是具有一定的层次化的结构的,一个数据在计算机实质上被保存的就是一个个0,1的比特位 ,它是每位这样存放的。但是去处理每个比特位的话那么可能在很多时候这个数据在构建时就会变得非常的繁琐,并且具有很强的不规律性,所以我们进一步把这8个比特位构成的称之为字节 。那么每一个byte它对应描述了一定的内容,而这些各个字节组成的一些具体的内容又称之为域 或者记录 。
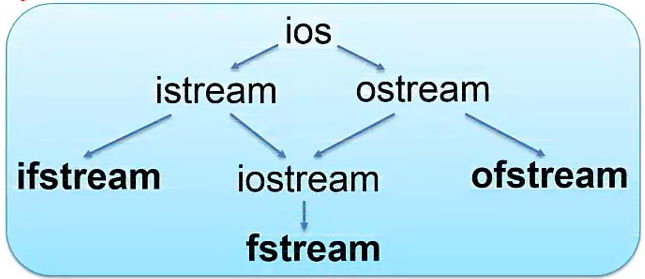
1.1.文件和流
(图中箭头表示派生)
1.2.文件操作
1.3.建立顺序文件 1 2 #include <fstream> //包含头文件 ofstream outFile ("clients.dat" , ios::out | ios:: binary) ;
也可以先创建ofstream对象,再用open函数打开;
一般要判断打开是否成功;
文件名可以给出绝对路径,也可以给相对路径;
没有交代路径信息,就是在当前文件夹下找文件
1 2 3 4 #include <fstream> ofstream fout; fout.open ("test.out" , ios::out | ios::binary); if (!fout) { cerr << "File open error!" << endl ;}
1.4.文件的读写指针
写指针 :(location可以为负值)
1 2 3 4 5 6 7 ofstream fout ("a1.out" , ios::app) ;long location = fout.tellp(); location = 10L ; fout.seekp(location); fout.seekp(location, ios::beg); fout.seekp(location, ios::cur); fout.seekp(location, ios::end );
读指针 :
1 2 3 4 5 6 7 ifstream fin ("a1.out" , ios::in) ;long location = fin.tellg(); location = 10L ; fin.seekg(location); fin.seekg(location, ios::beg); fin.seekg(location, ios::cur); fin.seekg(location, ios::end );
1.5.二进制文件读写 1 2 3 4 5 6 int x=10 ;fout.seekp(20 ,ios::beg); fout.write ( (const char *)(&x), sizeof (int ) ); fin.seekg(0 ,ios::beg); fin.read ( (char *)(&x), sizeof (int ) );
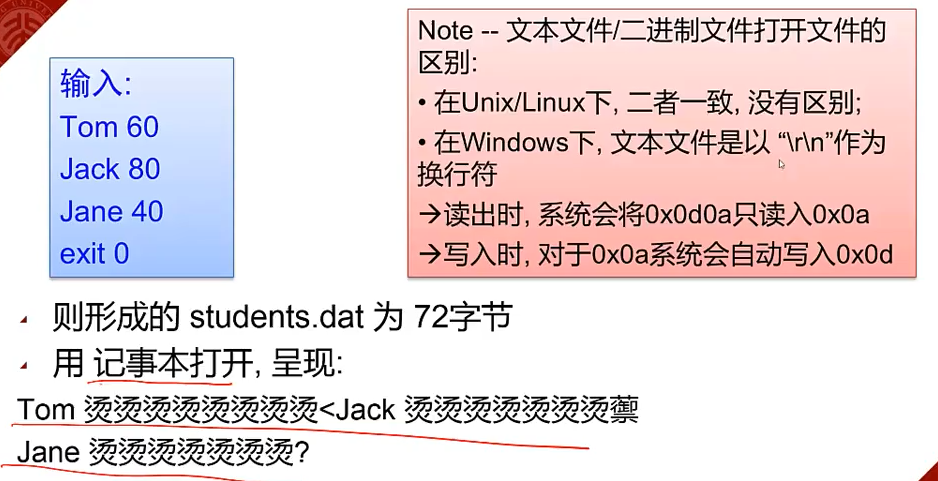
二进制文件读写,直接读/写二进制数据,记事本看未必正确
例子:从键盘输入几个学生的姓名和成绩,并以二进制文件形式存起来
1 2 3 4 5 6 7 8 9 10 11 12 13 14 15 16 17 18 19 20 #include <iostream> #include <fstream> #include <cstring> using namespace std ;class Student {public : char szName[20 ]; int nScore; }; int main () Student s; ofstream OutFile ("D:\\tmp\\student.dat" , ios::out | ios::binary) ; while (cin >> s.szName >> s.nScore) { if (stricmp(s.szName, "exit" ) == 0 ) break ; OutFile.write ((char *)&s, sizeof (s)); } OutFile.close (); return 0 ; }
对二进制文件来进行读写的时候最好是能够保持一致,即以二进制的形式去写入就以二进制的形式来读出 。例子2:
1 2 3 4 5 6 7 8 9 10 11 12 13 14 15 16 17 18 19 20 21 22 23 24 #include <iostream> #include <fstream> #include <cstring> using namespace std ;class Student {public : char szName[20 ]; int nScore; }; int main () Student s; ifstream inFile ("student.dat" , ios::in | ios::binary) ; if (!inFile) { cout << "error" << endl ; return 0 ; } while (inFile.read ((char *)&s, sizeof (s))) { int nReadedBytes = inFile.gcount(); cout << s.szName << " " << s.nScore << endl ; } inFile.close (); return 0 ; }
在刚才的两个例子当中介绍了如何对一个文件进行二进制形式的一个写入,或者是对一个文件具体以二进制的形式来进行读出,而在很多时候我们通常会对一个文件同时要进行读和写的操作。
例子3:将student.dat文件的Jane的名字改成Mike
1 2 3 4 5 6 7 8 9 10 11 12 13 14 15 16 17 18 19 20 21 22 23 24 25 #include <iostream> #include <fstream> #include <cstring> using namespace std ;class Student {public : char szName[20 ]; int nScore; }; int main () Student s; fstream iofile ("D:\\tmp\\student.dat" , ios::in | ios::out | ios::binary) ; if (!iofile) { cout << "error" ; return 0 ; } iofile.seekp(2 * sizeof (s), ios::beg); iofile.write ("Mike" , strlen ("Mike" ) + 1 ); iofile.seekg(0 , ios::beg); while (iofile.read ((char *)&s, sizeof (s))) cout << s.szName << " " << s.nScore << endl ; iofile.close (); return 0 ; }
1 2 3 4 5 ifstream fin ("test.dat" , ios::in) ;fin.close (); ofstream fout ("test.dat" ,ios::out) ;fout.close ();
例子4:文件拷贝,用法示例:mycopy src.dat dest.dat,即将src.dat拷贝到dest.at,如果dest.dat原来就有,则原来的文件会被覆盖。
1 2 3 4 5 6 7 8 9 10 11 12 13 14 15 16 17 18 19 20 21 22 23 24 25 26 27 28 #include <iostream> #include <fstream> using namespace std ;int main (int argc, char * argv[]) if (argc != 3 ) { cout << "File name missing!" << endl ; return 0 ; } ifstream inFile (argv[1 ], ios::binary | ios::in) ; if (!inFile) { cout << "Source file open error." << endl ; return 0 ; } ofstream outFile (argv[2 ], ios::binary | ios::out) ; if (!outFile) { cout << "New file open error." << endl ; inFile.close (); return 0 ; } char c; while (inFile.get (c)) outFile.put (c); outFile.close (); inFile.close (); return 0 ; }
2.函数模板 通过模板的使用就正式开始了泛型程序程序设计这样一个模块的学习。
泛型程序设计 (Generic Programming)
算法实现时不指定具体要操作的数据的类型;
泛型—算法实现一遍 $\to$ 适用于多种数据结构
优势:减少重复代码的编写
大量编写模板,使用模板的程序设计:
函数模板的形式 :
1 2 3 4 template <class 类型参数1, class 类型参数2,...> 返回值类型 模板名(形参表){ 函数体 }
例子:
1 2 3 4 5 6 7 8 9 10 11 12 template <class T > void Swap (T &x , T &y ){ T tmp = x; x = y; y = tmp; } int main () int n = 1 , m = 2 ; Swap(n, m); double f = 1.2 , g = 2.3 ; Swap(f, g); return 0 ; }
1 2 3 4 5 template <class T1 , class T2 > T2 print (T1 arg1 . T2 arg2 ){ cout <<arg1<<" " <<arg2<<endl ; return arg2; }
函数模板可以重载 ,只要它们的形参表不同即可,例如下面两个模板可以同时存在:
1 2 3 4 5 6 7 8 template <class T1 , class T2 > void print (T1 arg1 . T2 arg2 ){ cout <<arg1<<" " <<arg2<<endl ; } template <class T > void print (T arg1 . T arg2 ){ cout <<arg1<<" " <<arg2<<endl ; }
C++编译器遵循以下优先顺序:
Step1:先找参数完全匹配的普通函数(非由模板实例化而得的函数);
Step2:再找参数完全匹配的模板函数;
Step3:再找实参经过自动类型转换后能够匹配的普通函数;
Step4:上面的都找不到,则报错。
要注意赋值兼容原则引起函数模板中类型参数的二义性
1 2 3 4 5 6 7 8 template <class T1 , class T2 > void print (T1 arg1 . T2 arg2 ){ cout <<arg1<<" " <<arg2<<endl ; } ...... print (5 , 7 ); print (5.8 , 7.8 ); print (5 , 7.8 );
函数模板的类型参数可以用于函数模板的局部变量声明,也可以用于声明函数模板的返回值。
3.类模板
类模板 :在定义类的时候给它一个/多个参数,这个/些参数表示不同的数据类型;在调用类模板时,指定参数,由编译系统根据参数提供的数据类型自动产生相应的模板类 。
1 2 3 4 template <类型参数表> class 类模板名{ 成员函数和成员变量 };
1 2 3 4 5 template <型参数表>返回值类型 类模板名<类型参数名列表>::成员函数名(参数表) { ...... }
3.1类模板的定义 1 类模板名<真实类型参数表> 对象名(构造函数实际参数表);
下面是一个实例:
1 2 3 4 5 6 7 8 9 10 11 12 13 14 15 16 17 18 19 20 21 22 23 24 #include <iostream> #include <string> using namespace std ;template <class T1 ,class T2 >class Pair {public : T1 key; T2 value; Pair(T1 k, T2 v) :key(k), value(v) { }; bool operator <(const Pair<T1, T2> & p) const ; }; template <class T1 , class T2 >bool Pair <T1,T2>:operator <(const Pair<T1, T2> & p) const { return key < p.key; } int main () Pair<string , int >student("Tom" , 19 ); cout << student.key << " " << student.value; return 0 ; }
输出结果:Tom 19
3.2.使用类模板声明对象
编译器由类模板生成类的过程叫类模板的实例化
编译器自动用具体的数据类型 $\to$ 替换类模板中的类型参数,生成模板类的代码
由类模板实例化得到的类叫模板类
同一个类模板的两个模板类是不兼容的
1 2 3 Pair<string ,int > *p; Pair<string ,double > a; p = & a;
3.3.函数模板作为类模板成员 1 2 3 4 5 6 7 8 9 10 11 template <class T >class A {public : template <class T2 > void Func (T2 t ){cout << t; } }; int main () A<int > a; a.Func('K' ); return 0 ; }
程序输出:K
3.4.类模板与非类型参数
类模板的参数声明中可以包括非类型参数 ,如template<class T, int elementsNumber>
非类型参数:用来说明类模板中的属性,且非类型参数必须实例化,实参必须是编译时常量表达式
类型参数:用来说明类模板中的属性类型,成员操作的参数类型和返回值类型
1 2 3 4 5 6 7 8 9 template <class T ,int size >class Array { T array [size ]; public : void Print () for (int i=0 ; i < size ; ++i) cout << array [i] << endl ; } };
注意:由不同的参数生成的模板类是不同的,Array<int,40>和Array<int,50>完全是两个类,这两个类的对象之间不能互相赋值,Array<int,40>实例化后得到的模板类是一个拥有一个固定长度为5的int型数组的成员变量的类。
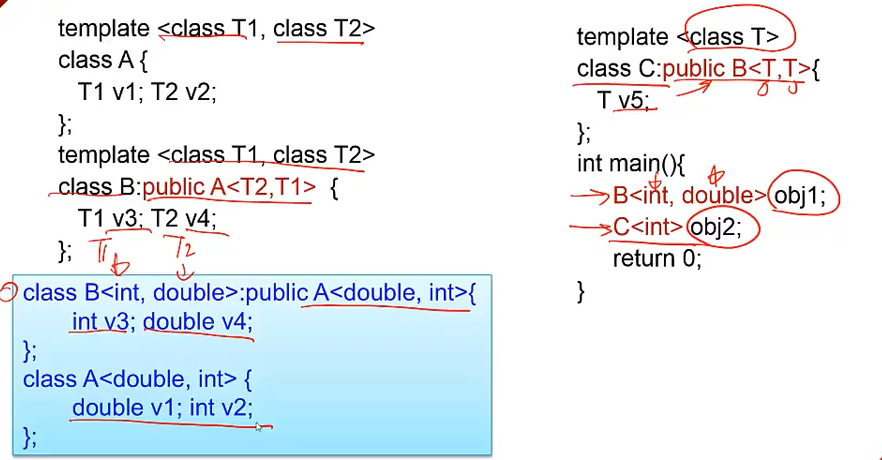
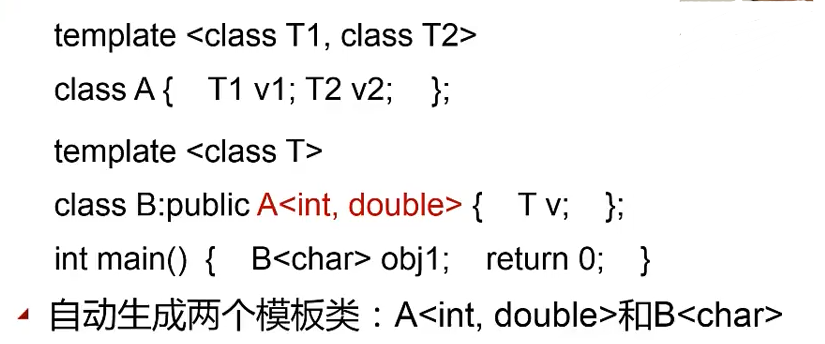
3.5.类模板与继承
模板类(即类模板中类型/非类型参数实例化后的类)派生出类模板
3.6.类模板与静态成员 类模板中可以定义静态成员:
从该类模板实例化得到的模板类的所有对象都包含同样的静态成员
例如,声明一个类模板A,有一个静态成员变量count用于计数,有一个静态成员函数printCount()用于输出计数结果。由类模板 A 实例化的两个模板类 A<int> 和 A<double> 各自拥有一个名为 count 的静态成员变量,和一个名为 printCount() 的静态成员函数。A<int> 和 A<double> 是不同的模板类,不能共享静态成员变量 count,因而需要分别初始化。在声明了 1 个 A<int> 对象和 2 个 A<double> 对象之后,A<int>::count 的值变为 1,A<double>::count 的值变为 2
1 2 3 4 5 6 7 8 9 10 11 12 13 14 15 16 17 18 19 20 21 22 23 #include <iostream> using namespace std ;template <class T >class A { static int count; public : A() { ++count; } ~A() { --count; } A(const A &a) { ++count; } static void printCount () cout << count << endl ; } }; template <> int A<int >::count = 0 ;template <> int A<double >::count = 0 ;int main () A<int > ia; A<double > da1, da2; ia.printCount(); A<double >::printCount(); return 0 ; }
3.7.类模板与友元 类模板与友元大致分为四种情况:
例如,下面的代码中声明了一个类模板 C,可以将普通函数 func1() 声明为 C 的友元,使得 func1() 可以访问 val;还可以将普通类 A 声明为类模板 C 的友元;也可以将普通类 B 的成员函数 func2() 声明为类模板 C 的友元。
1 2 3 4 5 6 7 8 9 10 11 12 13 14 15 class A {class B {public : void func2 () template <class T >class C { T val; friend void func1 () friend class A ; friend void B::func2(); public : C(T _val) : val(_val) { } }; C<int > c1(4 ); C<double > c2(2.8 ); void func1 () cout << c1.val << endl ; }void B::func2() { cout << c2.val << endl ; }
例如,下面声明了重载流运算符的两个函数模板为类模板 Array 的友元,两个函数模板的具体实现如下,作为友元可以访问 size 和 ptrElement ,分别用于依次读入和输出数组中的每个元素。声明 Array<int> 对象 a 时,自动生成了类模板 Array<int>,并根据两个函数模板自动重载了对应的流运算符:istream &operator >> (istream &, Array<int> &)ostream &operator << (ostream &, const Array<int> &)
1 2 3 4 5 6 7 8 9 10 11 12 13 14 15 16 17 18 19 20 21 22 23 24 25 26 27 28 29 30 31 32 33 34 35 36 37 38 39 40 #include <iostream> using namespace std ;template <class T1 >class Array { T1 *ptrElement; int size ; public : Array(int _size = 0 ) : size (_size) { ptrElement = new T1[_size]; } ~Array() { delete [] ptrElement; } template <class T2 > friend istream &operator >> (istream &, Array <T2> &); template <class T3 > friend ostream &operator << (ostream &, const Array<T3> &); }; template<class T2> istream &operator >> (istream &s , Array <T2> &a ) { for (int i = 0 ; i < a.size ; ++i) { s >> *(a.ptrElement + i); } return s; } template <class T3 >ostream &operator << (ostream &s, const Array<T3> &a) { for (int i = 0; i < a.size; ++i) { s << *(a.ptrElement + i) << " "; } return s; } int main(){ Array<int> a(5); cin >> a; // 若输入 1 2 3 4 5 cout << a; // 则输出 1 2 3 4 5 return 0; }
例如下面的普通类 A 和 B 都将 print() 函数模板声明为自己的友元,根据函数模板自动生成 print(const A &) 和 print(const B&) 来分别输出类 A 的 int 型私有成员变量 v 和类 B 的 double 型私有成员变量 v。
1 2 3 4 5 6 7 8 9 10 11 12 13 14 15 16 17 18 19 20 21 22 23 24 25 26 27 class A { int v; public : A(int _v = 3 ) : v(_v) { } template <class T > friend void print (const T &); }; class B { double v; char *buf; void func () public : B(double _v = 2.1 ) : v(_v) { } template <class T > friend void print (const T &); }; class A {int v; ... };class B {double v; ... };template <class T >void print (const T &p ) {cout << p.v << endl ; }int main () A a; print (a); B b; print (b); return 0 ; }
例如下面的类模板 B 将类模板 A 声明为了自己的友元,在声明 b 对象时,自动生成模板类 B<int>;在声明 a 对象时,则自动生成模板类 A< B<int> >。由于 B<int> 声明了模板类 A 类为自己的友元,因此 A< B<int> > 对象 a 可以通过 func() 访问并输出 B<int> 对象 b 的私有成员变量 v。
1 2 3 4 5 6 7 8 9 10 11 12 13 14 15 16 17 18 19 20 21 22 #include <iostream> using namespace std ;template <class T >class A {public : void func (const T &p) cout << p.v; } }; template <class T >class B { T v; public : B(T _v) : v(_v) { } template <class T2 > friend class A ; }; int main () B<int > b(5 ); A< B<int > > a; a.func(b); return 0 ; }
类模板的一个综合示例:
1 2 3 4 5 6 7 8 9 10 11 12 13 14 15 16 17 18 19 20 21 22 23 24 25 26 27 28 29 30 31 32 33 34 35 36 37 38 #include <iostream> #include <string> using namespace std ;template <class T , int size >class A { T array [size ]; public : A(T* array_) { for (int i = 0 ; i < size ; i++) { array [i] = array_[i]; } } T& operator [](int index) { return array [index]; } T sum () { T s = array [0 ]; for (int i = 1 ; i < size ; i++) { s += array [i]; } return s; } }; int main () int b1[10 ] = {0 , 1 , 2 , 3 , 4 , 5 , 6 , 7 , 8 , 9 }; A<int , 10 > a1 = b1; cout << a1[2 ] << endl ; double b2[5 ] = {4.2 , 0.0 , 3.1 , 2.7 , 5.2 }; A<double , 5 > a2 = b2; cout << a2.sum() << endl ; string b3[4 ] = {"Hello" , ", " , "world" , "!" }; A<string , 4 > a3 = b3; cout << a3.sum() << endl ; return 0 ; }
4. string类 string类本身是一个模板类,而它本身其实是由一个类模板实例化得到的,string类是一个非常好用的类库,在很多字符串处理的场合都会用到string类。
与string类有关的一些函数:
4.1.基础操作
string类是一个模板类,它的定义为:typedef basic_string<char>string;使用string类要包含头文件:#include<string>
string对象的初始化,string 类提供了多种构造函数:
可以根据字符串常量(const char *)来构造 string 对象
也可以指定字符串长度和填充的字符来构造 string 对象
1 2 3 string s1 ("Hello" ) string S2 (8 ,'x' ) string month = "March" ;
不提供以字符和整数为参数的构造函数,以下都是错误的初始化方法:
1 2 3 4 string error = 'c' ; string error2 ('u' ) string error3 = 22 ; string error4 (8 )
构造的string对象太长而无法表达 $\to$ 会抛出length_error异常
string对象的长度用成员函数length()读取:
1 2 string s ("hello" ) cout << s.length() << endl ;
1 2 string stringObject;cin >> stringObject;
1 2 string s;getline(cin ,s);
4.2. string的赋值和连接
1 2 string s1("cat"), s2; s2 = s1;
1 2 3 string s1("catpig"), s2, s3; s2.assign(s1); s3.assign(s1,1 ,3 );
单个字符复制:s2[5] = s1[3] = 'a';
逐个访问string对象中的字符
1 2 3 string s1 ("Hello" ) for (int i = 0 ; i < s.length(); i++) cout << s1.at(i) << endl ;
1 2 3 string s1("good"), s2("morning"); s1 += s2; cout << s1;
1 2 3 4 5 6 string s1("good"), s2("morning"); s1.append(s2); cout << s1; s2.append(s1,3 ,s1.size ()); cout << s2;
1 2 3 string s1 ("hello world" ) s2 = s1.substr(4 ,5 ); cout << s2 << endl ;
4.3.比较string
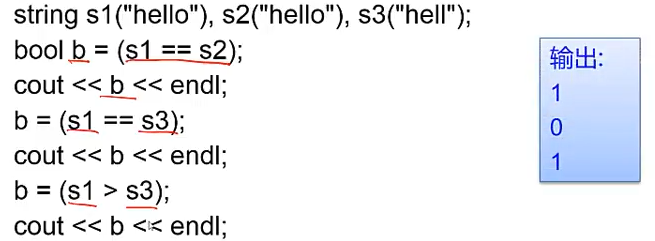
可以用关系运算符比较string对象的大小,==,>,>=,<,<=,!=,利用字符在字典中的顺序进行比较,且对字母的大小写敏感,返回值都是bool类型,成立返回true,否则返回false。
也可以使用成员函数 compare(string) 比较字符串大小,返回值为 int 型
若当前对象比被比较的对象(即括号中的对象)大,则返回 1;若相等则返回 0 ;若比被比较的对象小,则返回 -1。
比较原则为逐字符比较;若前面的字符全部相等,则较长的字符串大。
也可以使用成员函数 compare(int, int, string) 或 compare(int, int, string, int, int) 比较两个子串的大小,返回值为 int 型。
比较规则与 compare(string) 相同
使用时依次指定子串的起始位置和长度即可
1 2 3 4 5 6 7 8 9 10 11 int main () string s1("Alice"), s2("Bob"); string s3 ("Alice and Bob" ) cout << s2.compare(s1) << endl ; cout << s1.compare(s3) << endl ; cout << s2.compare(0 , 3 , s3, 10 , 3 ); return 0 ; }
4.4.寻找string中的字符
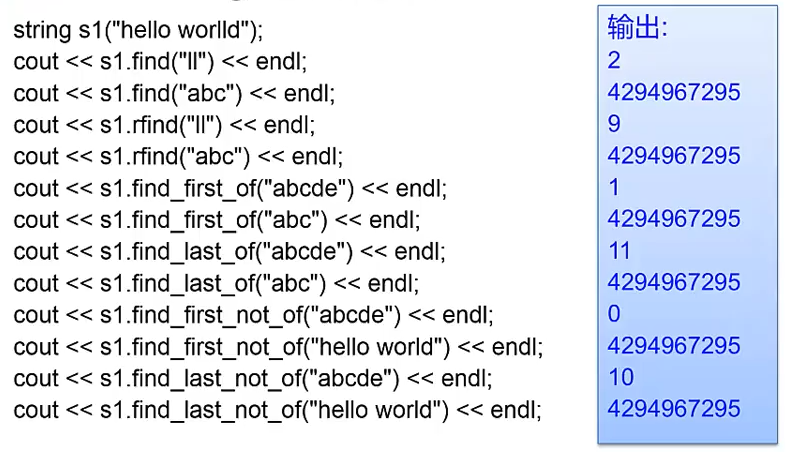
成员函数find(),如下例在s1中从前向后查找 lo第一次出现的地方,如果找到,返回lo开始的位置,即l所在的位置下标;如果找不到,返回string::nps(string中定义的静态常量)
1 2 string s1{"hello world" };s1.find ("lo" );
成员函数rfind(),如下例在s1中从后向前查找 lo第一次出现的地方,如果找到,返回lo开始的位置,即l所在的位置下标;如果找不到,返回string::nps
1 2 string s1{"hello world" };s1.rfind("lo" );
成员函数find_first_of(),如下例在s1中从前向后查找 abcd中任何一个字符第一次出现的地方,如果找到,返回找到字母的位置;如果找不到,返回string::nps
1 2 string s1{"hello world" };s1.find_first_of("abcd" );
成员函数find_last_of(),如下例在s1中从前向后查找 abcd中任何一个字符最后一次出现的地方,如果找到,返回找到字母的位置;如果找不到,返回string::nps
1 2 string s1{"hello world" };s1.find_last_of("abcd" );
成员函数find_first_not_of(),如下例在s1中从前向后查找不在 abcd中的字符第一次出现的地方,如果找到,返回找到字符的位置;如果找不到,返回string::nps
1 2 string s1{"hello world" };s1.find_first_not_of("abcd" );
成员函数find_last_not_of(),如下例在s1中从后向前查找不在 abcd中的字符第一次出现的地方,如果找到,返回找到字符的位置;如果找不到,返回string::nps
1 2 string s1{"hello world" };s1.find_last_not_of("abcd" );
4.5.替换string的字符
成员函数erase(),删除字符串中指定位置及以后的内容;缺省值为 0 ,即清除字符串的所有内容(变成一个空串 “” )
1 2 3 4 5 string s1 ("hello world" ) s1.erase(5 ); cout << s1;cout << s1.length(); cout << s1.size ();
1 2 3 4 string s1 ("hello worlld" ) cout << s1.find ("ll" , 1 ) << endl ;cout << s1.find ("ll" , 2 ) << endl ;cout << s1.find ("ll" , 3 ) << endl ;
成员函数replace(int, int, string)将字符串中的某一段替换为指定子串,前两个参数指定需要替换的起始位置和长度,第三个参数是进行替换的子串
1 2 3 4 5 6 string s1 ("hello world" ) s1.replace(2 ,3 ,"haha" ); cout << s1; s1.replace(2 ,3 ,"haha" ,1 ,2 ); cout << s1;
4.6.在string中插入字符
1 2 3 4 5 6 string s1 ("hello world" ) string s2 ("show insert" ) s1.insert(5 ,s2); cout << s1 << endl ; s1.insert(2 ,s2,5 ,3 ); cout << s1 << endl ;
可以使用成员函数 push_back(char) 在字符串末尾增加一个字符;C++11 标准中还增加了成员函数 pop_back() ,可以用来删除字符串中的最后一个字符。
1 2 3 4 5 string s = "" ;for (int i = 0 ; i < 7 ; ++i) { s.push_back('A' + i); } cout << s << endl ;
4.7.将string转换成C语言式
成员函数c_str(),返回传统的const char*类型字符串,且该字符串以’\0‘结尾;data()也可以,但不会在字符串末尾增加结束符。
1 2 3 4 string s1 ("hello world" ) printf ("%s\n" ,s1.c_str()); const char *p = s1.data();printf ("%s\n" , p);
C++11 中提供了 std::to_string() 函数,可以将 int / unsigned int / float / double 等数值转换为 string 对象,效果与 C 语言中的 %i / %u / %f / %lf 等相同
1 2 3 4 5 6 7 8 9 10 11 12 #include <string> #include <iostream> using namespace std ;int main () int x = 42 ; double p = 3.14 ; string s = to_string(x); s += " " + to_string(p); cout << s << endl ; return 0 ; }